
One of the great things about Smackdab is how easy we make it for you to import your information from iPoint, so you can get a running leap in Smackdab!
The process is simple:
Connect iPoint to Smackdab
Decide if you want to send data from Smackdab to iPoint
Bring in data from iPoint - Starting with Users
Assign that data to users in Smackdab
Import the data from iPoint
Some things to keep in mind before beginning the sync:
If you want your contacts to be split between Companies and Contacts (to separate customers from companies or builders), make sure they're marked correctly in iPoint before beginning the sync process.
Activities that do not have a start date/time listed will cause an error and will not be imported into Smackdab.
If you have multiple records with the same email address, that email will be removed from subsequent records. Emails in Smackdab are unique for each record.
If you have a lot of Contact records that are parents of other records, enable Parent Records in your Contact and Company modules in Smackdab.
Video on How to Sync iPoint to Smackdab:
Connect iPoint to Smackdab:
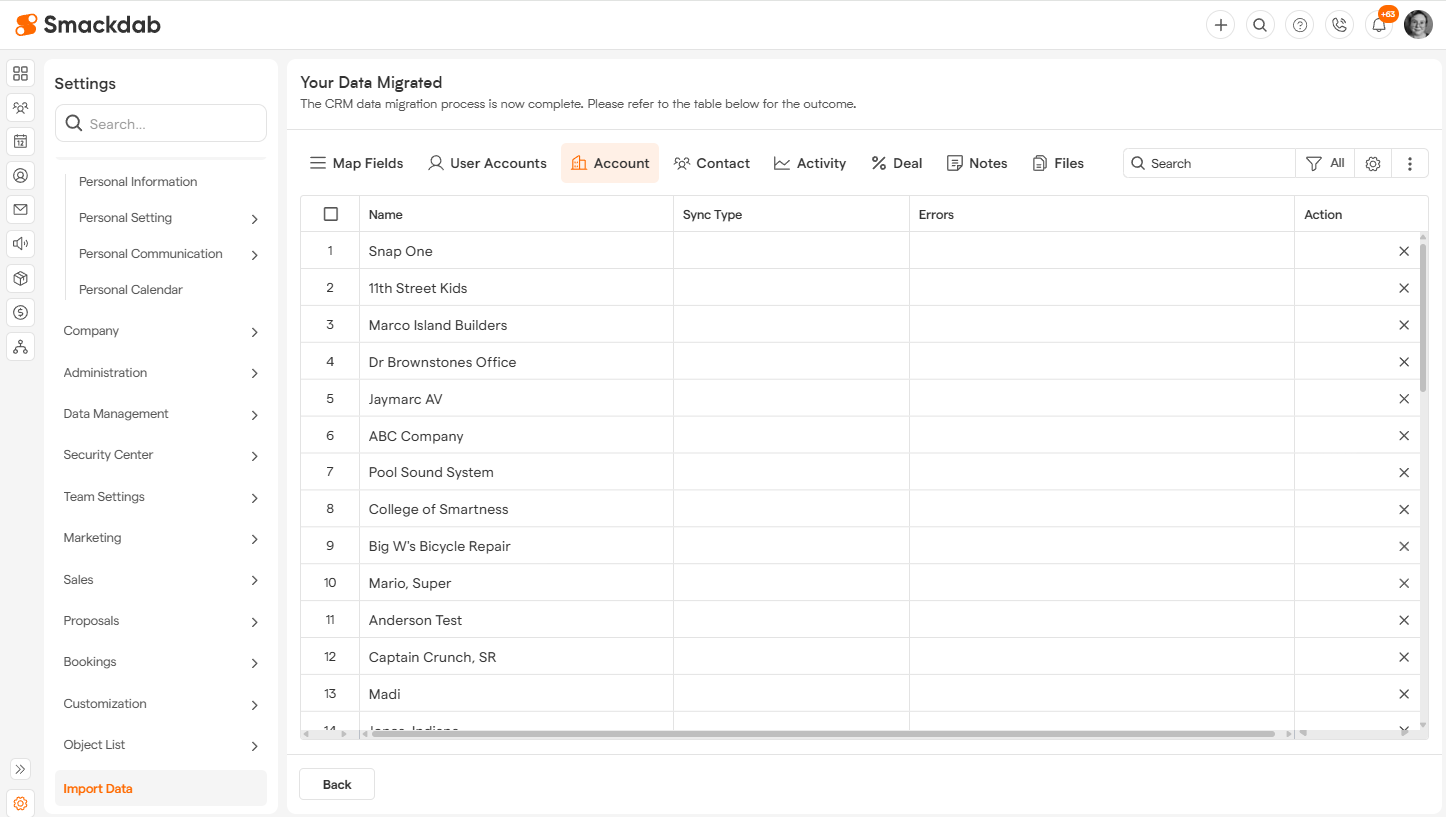
In Smackdab, navigate to the Settings page. At the bottom of the list of Settings available to you, will be one called "Import Data". Click that, and you'll be brought to this page, showing the options available to import:
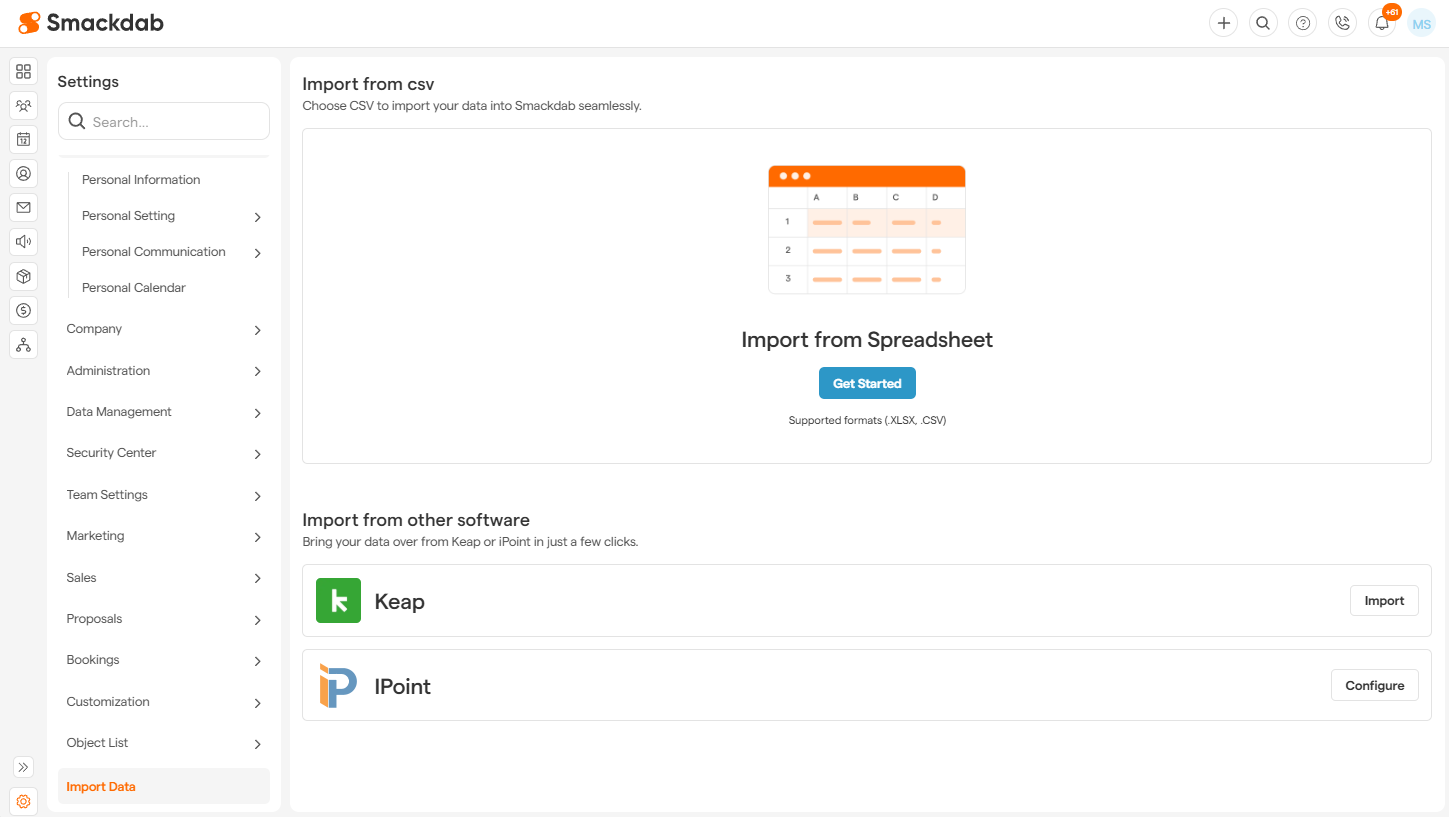
To begin the process of importing your data from iPoint, click the "Configure" button to the right of the iPoint logo.
This will bring you to a login page titled "Migrate your data" - the login you'll use is the same one you use to login to iPoint. If Smackdab recognizes your iPoint login, it will show your company name in the "Select Company" dropdown menu.
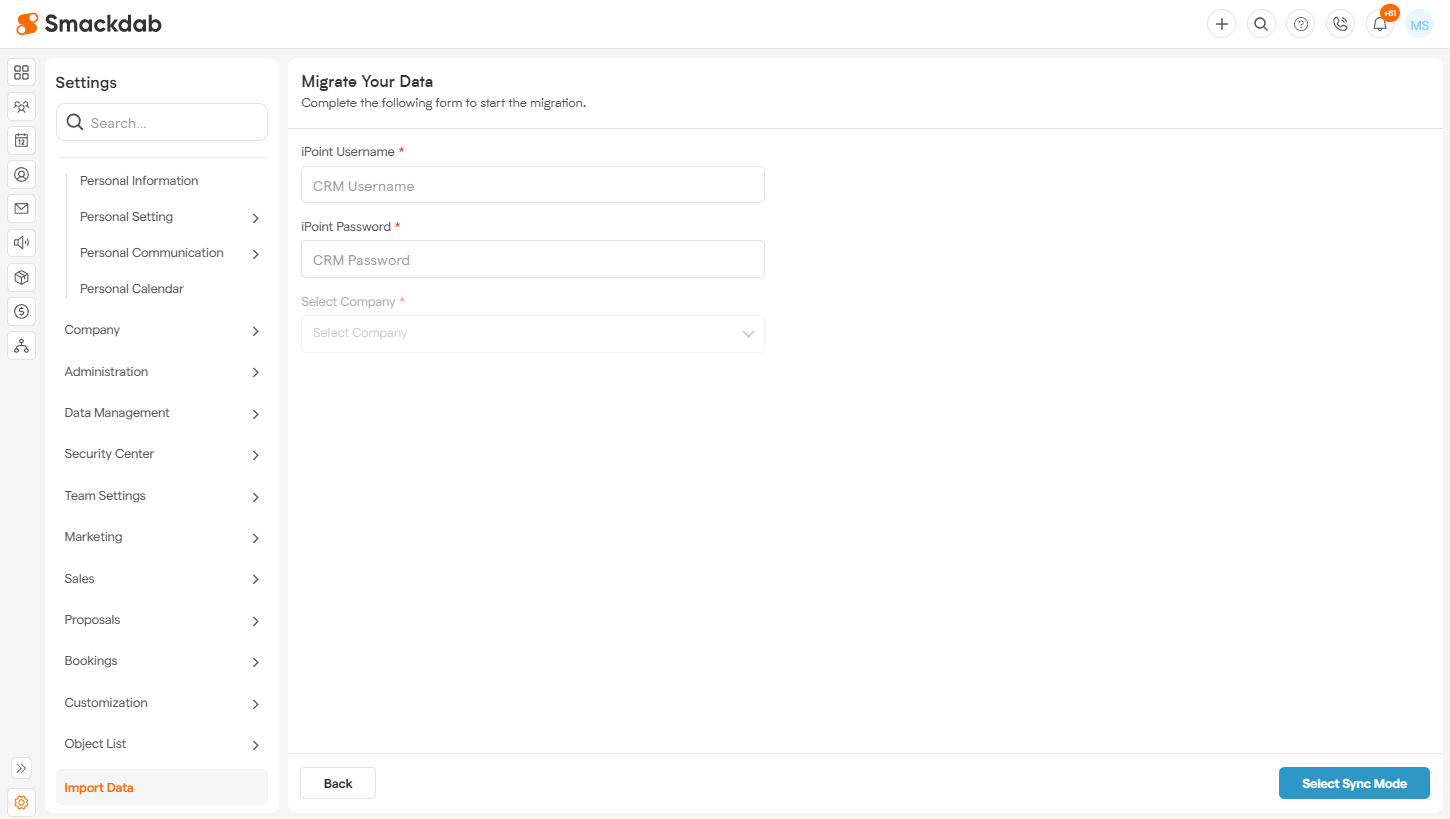
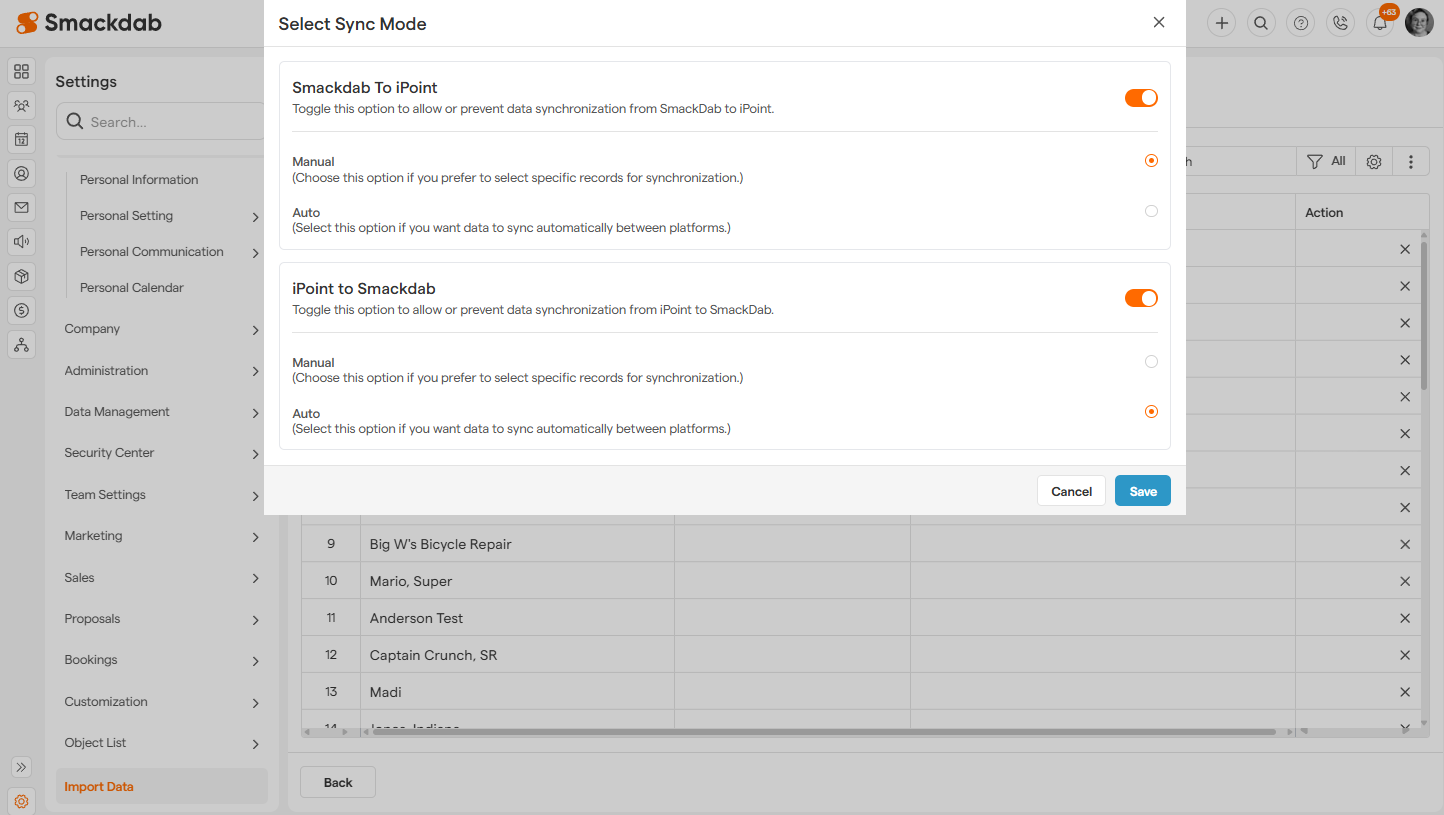
Once your login information is entered and the correct company shows under "Select Company", click on the "Select Sync Mode" button on the bottom right.
Choosing your type of connection:
Smackdab and iPoint can communicate in two directions - from iPoint to Smackdab, and from Smackdab to iPoint.
Note: As of now, iPoint will continuously auto-update to Smackdab - once it's set up, there should be no need to go back into Import Data unless you want to change the sync method.
For data exporting from Smackdab to iPoint or iPoint to Smackdab, you can have it set to Manual sync (choose and manually push records to/from iPoint and Smackdab), or Auto sync (where the system will automatically sync the records, without manual input).
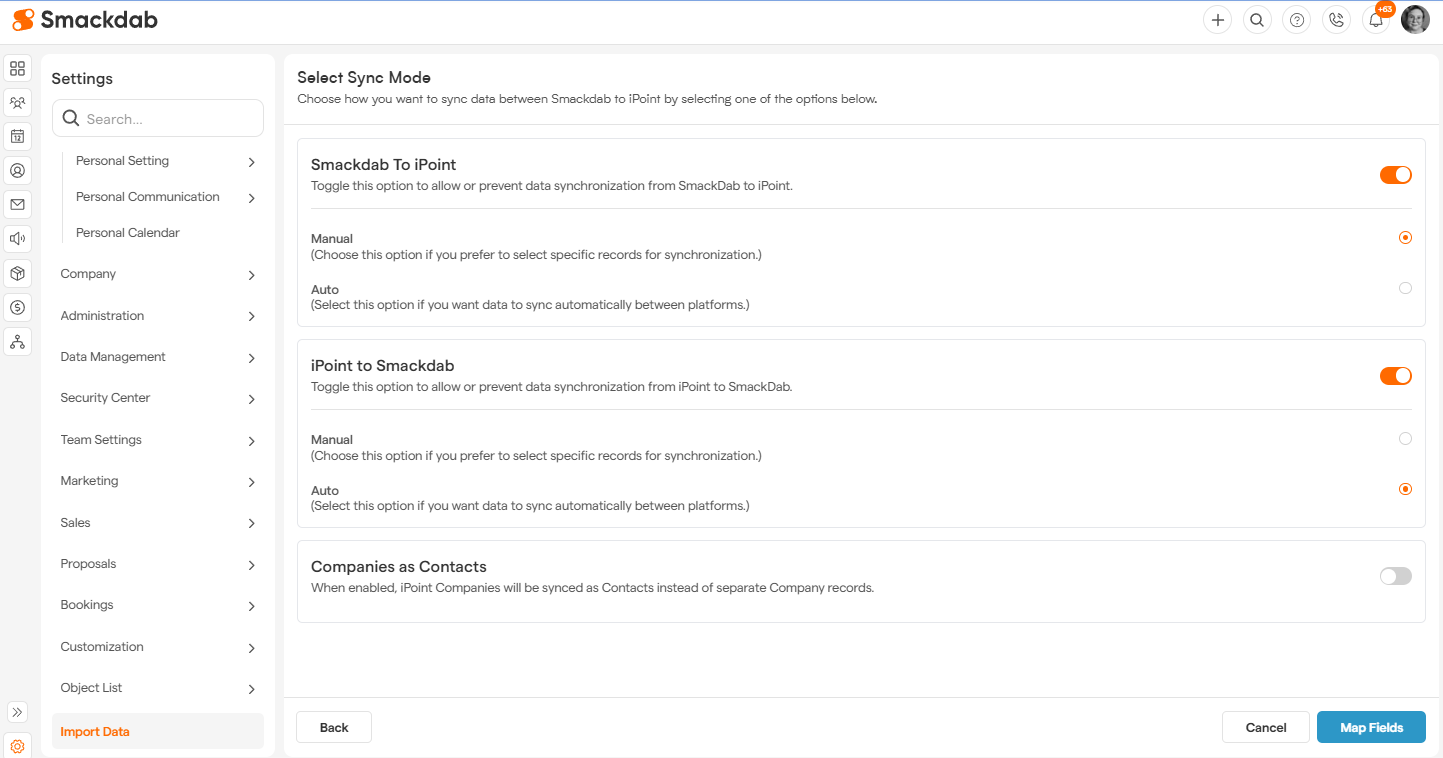
You also have the option of syncing all of your CRM records in iPoint to Smackdab just into one module - this is the Companies as Contacts toggle. This will not separate between a person/customer (adding to Contacts module) and company (adding to the Company module) - it will put all records into the Contacts module only.
Mapping Fields between iPoint and Smackdab:
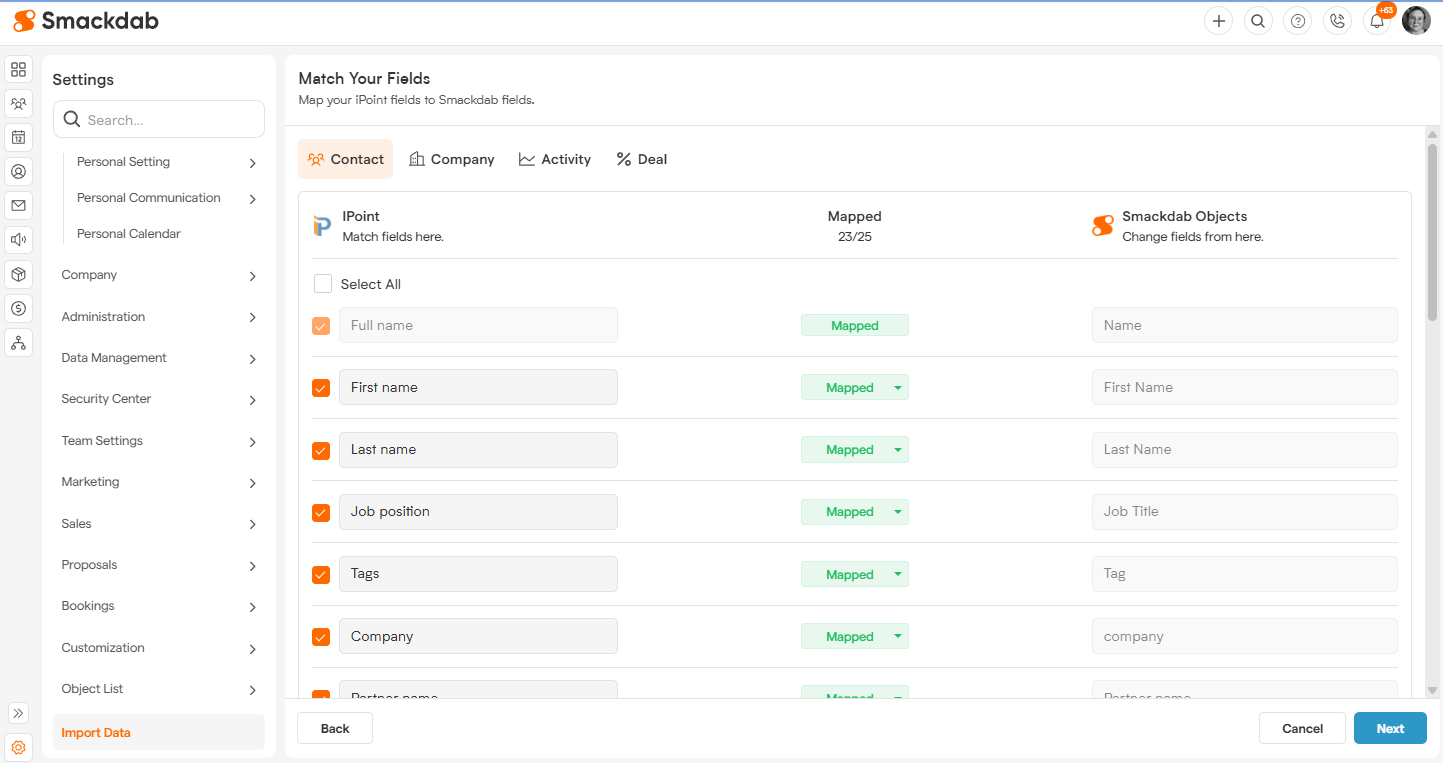
The first step in the sync process is to choose which fields you want to bring over from iPoint, and making sure they're mapped to the correct fields within Smackdab.
If you don't want a field to come over into Smackdab, click on the orange checkbox to the left of the field name.
You'll repeat this process for each CRM module: Contact, Companies, Activities, and Deals.
Bring in Data from iPoint - Assigning Users:
Once you click on "Start User Sync", it will pop up a friendly window confirming that you're ready to start, and then it will begin by importing your Users from iPoint to Smackdab.
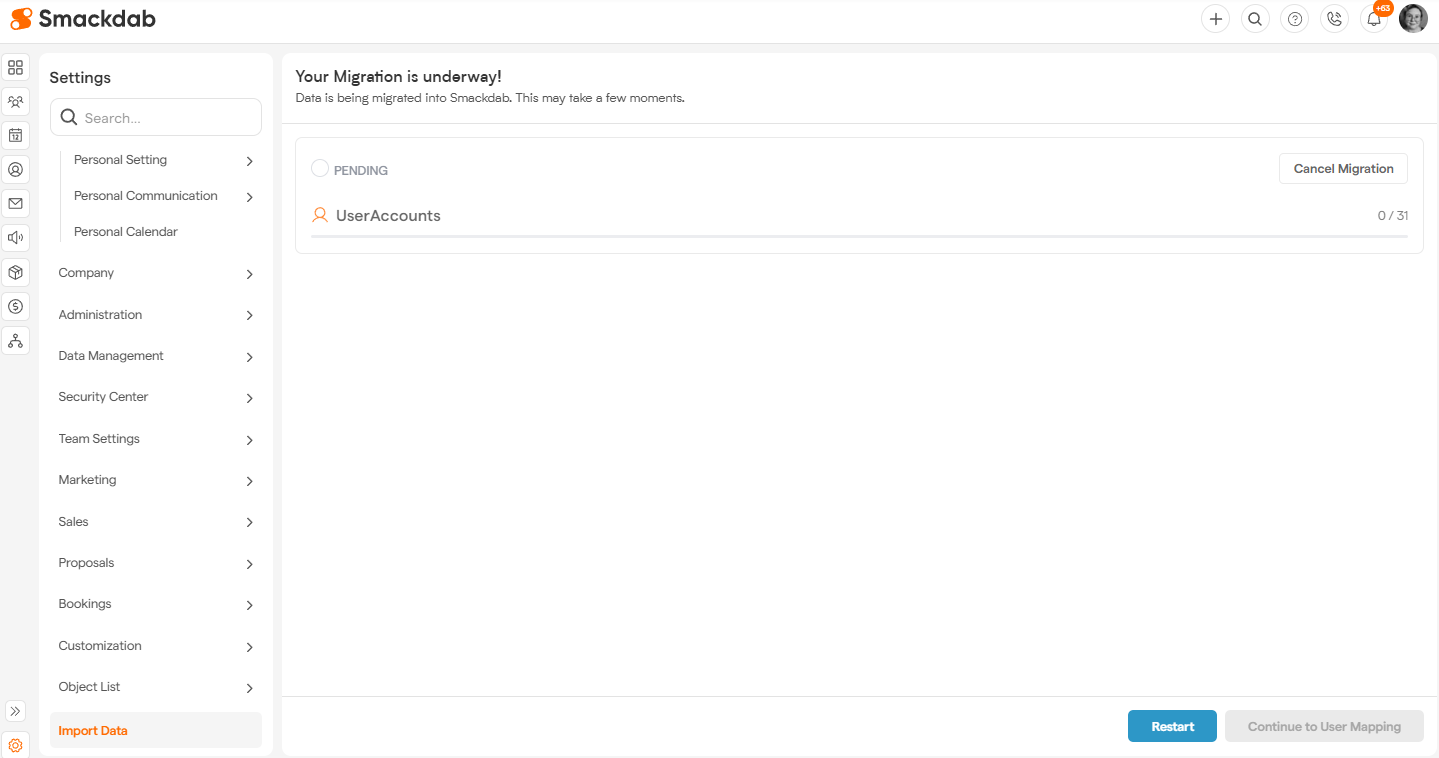
Once it's done gathering the User information from iPoint, click on "Continue to User Mapping".
What happens next is Smackdab will use this data to associate the records of a user within iPoint to the records of a user within Smackdab, with regards to creation and assignment of the records.
For example, if user Rob had an Activity in iPoint (say a task that was assigned for him to do on the upcoming Tuesday at 3PM), when you bring that data into Smackdab, you can assign records that were originally created for Rob to a different user, if you don't want to have him as a user in Smackdab. That way the record isn't "lost" in the system.
It's also quite handy in that if you only want to have one person have access to Smackdab, you can assign all users to that one person, instead of needing to create all the users.
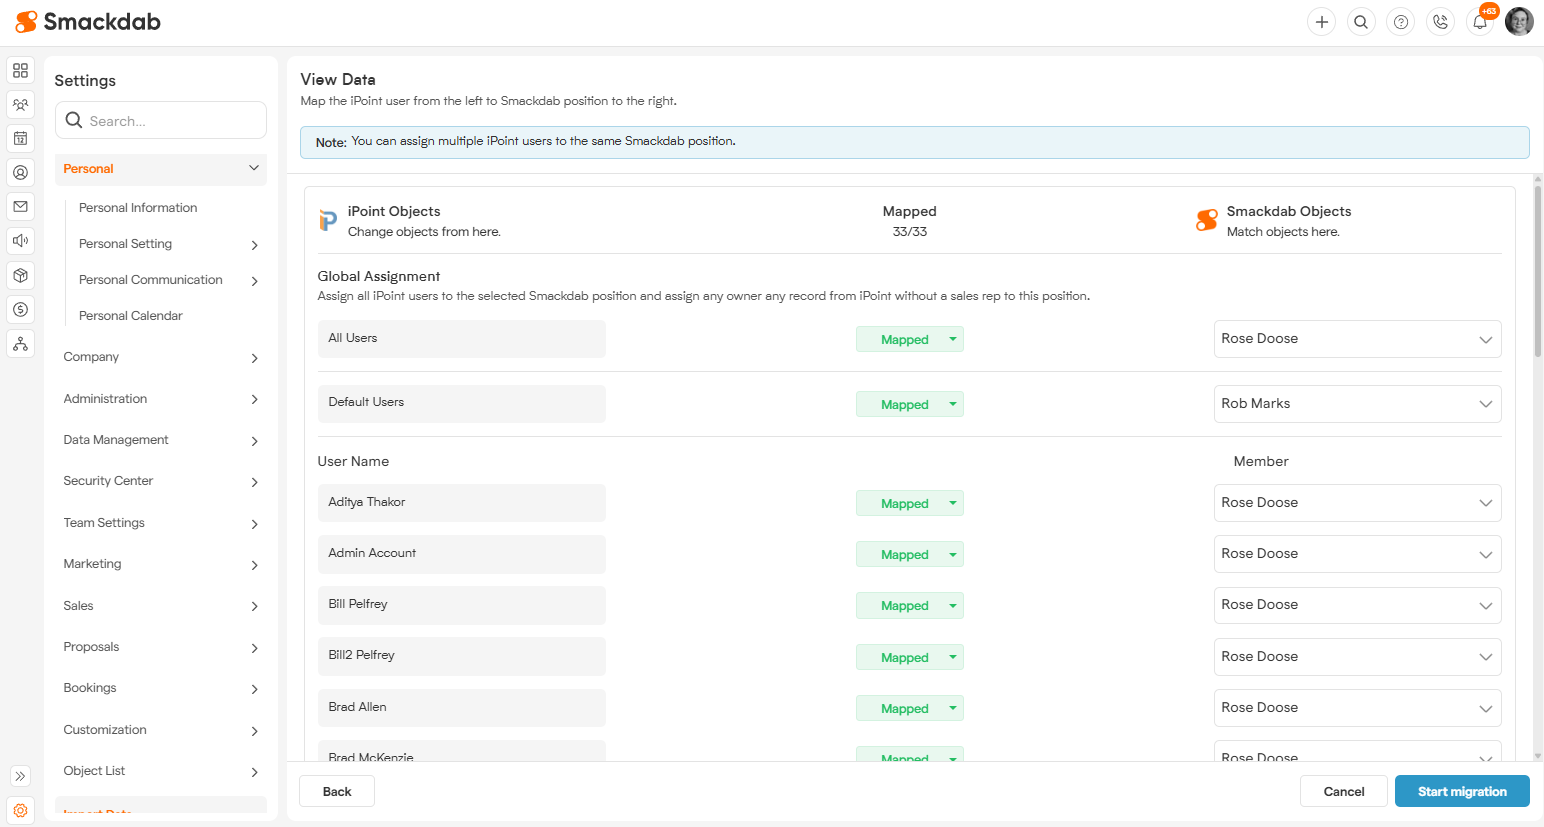
On this screen, on the left you'll see a list of users in iPoint that have data associated with them that will be brought over into Smackdab.
On the right, is who you want to assign it to in Smackdab.
Clicking the drop down will show the current users that you have created within Smackdab, or the option to Add New User (which will create that new user and assign it to the iPoint user at the same time).
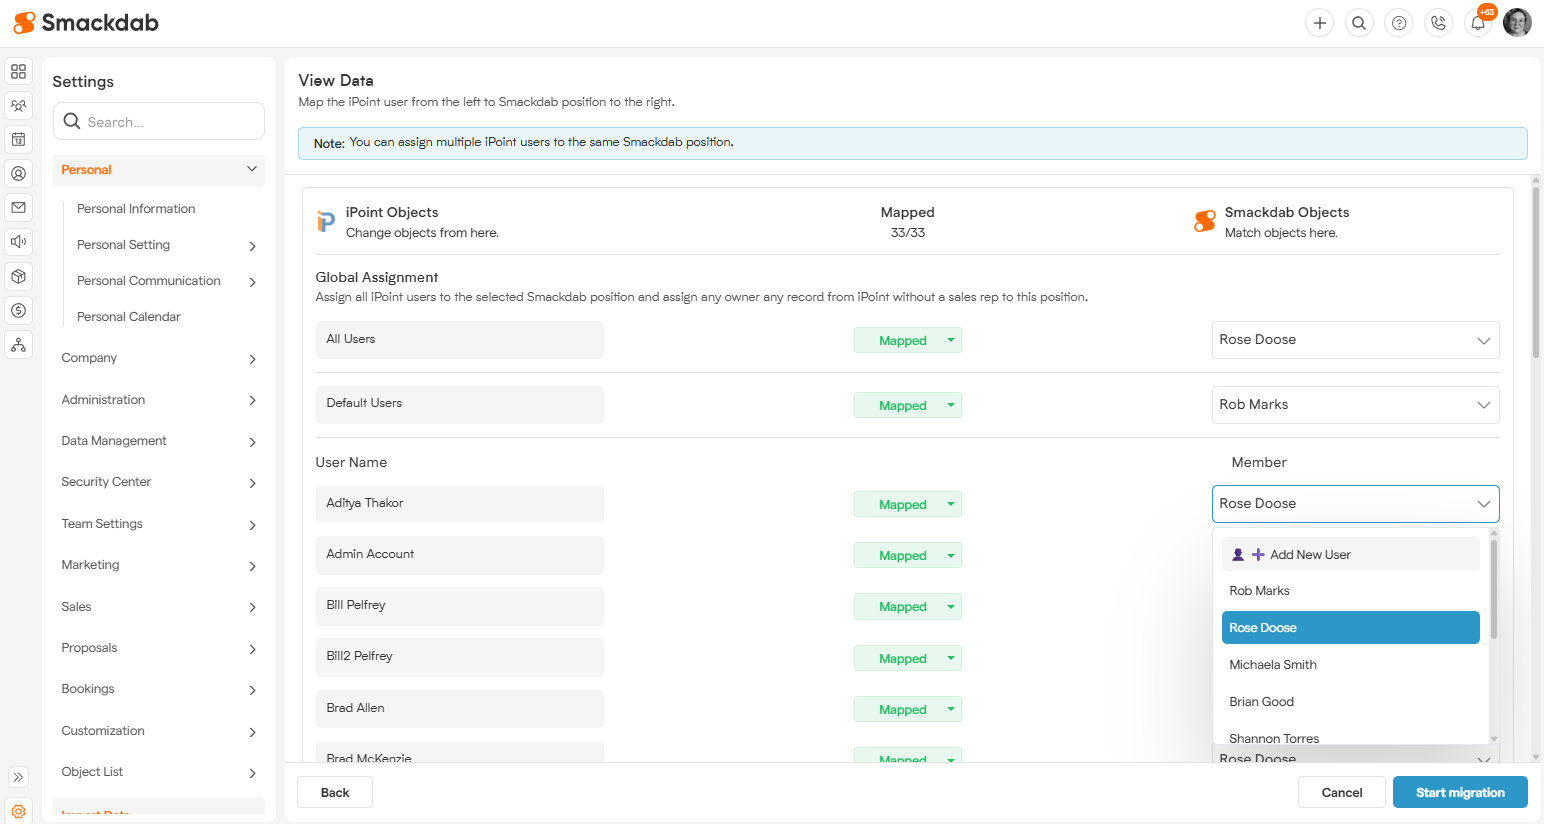
If you don't want to create additional users and only want to have one user in Smackdab, choose your main user in the drop down menu, and then click the "Assign to all" button.
Once you're done, continue the migration process by clicking the "Start Migration" on the bottom right to bring in all of iPoint's records.
Importing from iPoint - Importing Data, and Done!
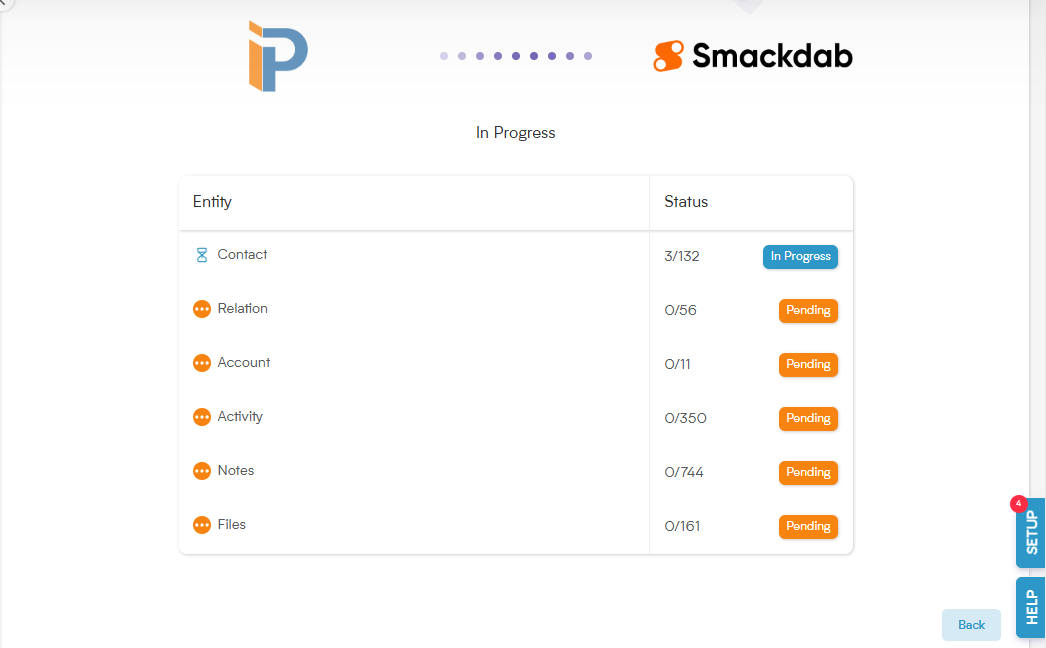
Once you've begun the migration process, all you need to do is sit back and wait! This usually takes a few minutes, but once it's complete, you can check out the new records that have been pulled into Smackdab.
Note: Be sure to check both the Companies and Contacts sections of Smackdab for your customer/contact records.
To Remove iPoint Syncing:
Click on "Import Data".
Click on "Configure" button beside the iPoint logo.
This will take you to the data screen, where you can make changes to the sync, or remove the connection between iPoint and Smackdab. It will also show you any errors that have occurred with synced records.
You can click on the Gear icon on the top right to make changes to the sync.
Click on the vertical dots icon to Disable the Migration (which cancels all sync between the two systems) or Cancel to remove the connection.
Things to keep in mind when importing data:
There are limits to the data that will (at this time) be imported into Smackdab, and pushed back to iPoint.
At this time, only Customers and Contacts in your CRM in iPoint will automatically sync to Smackdab.
If you have a lot of parent/child relationships with your Customers in iPoint, we do recommend that you turn on parent relationships in Smackdab.
To do this, go to Settings>Customization>Modules>Contact>Settings and then navigate to the Parent Contact tab. There you'll see a toggle to "Enable Parent Contact".
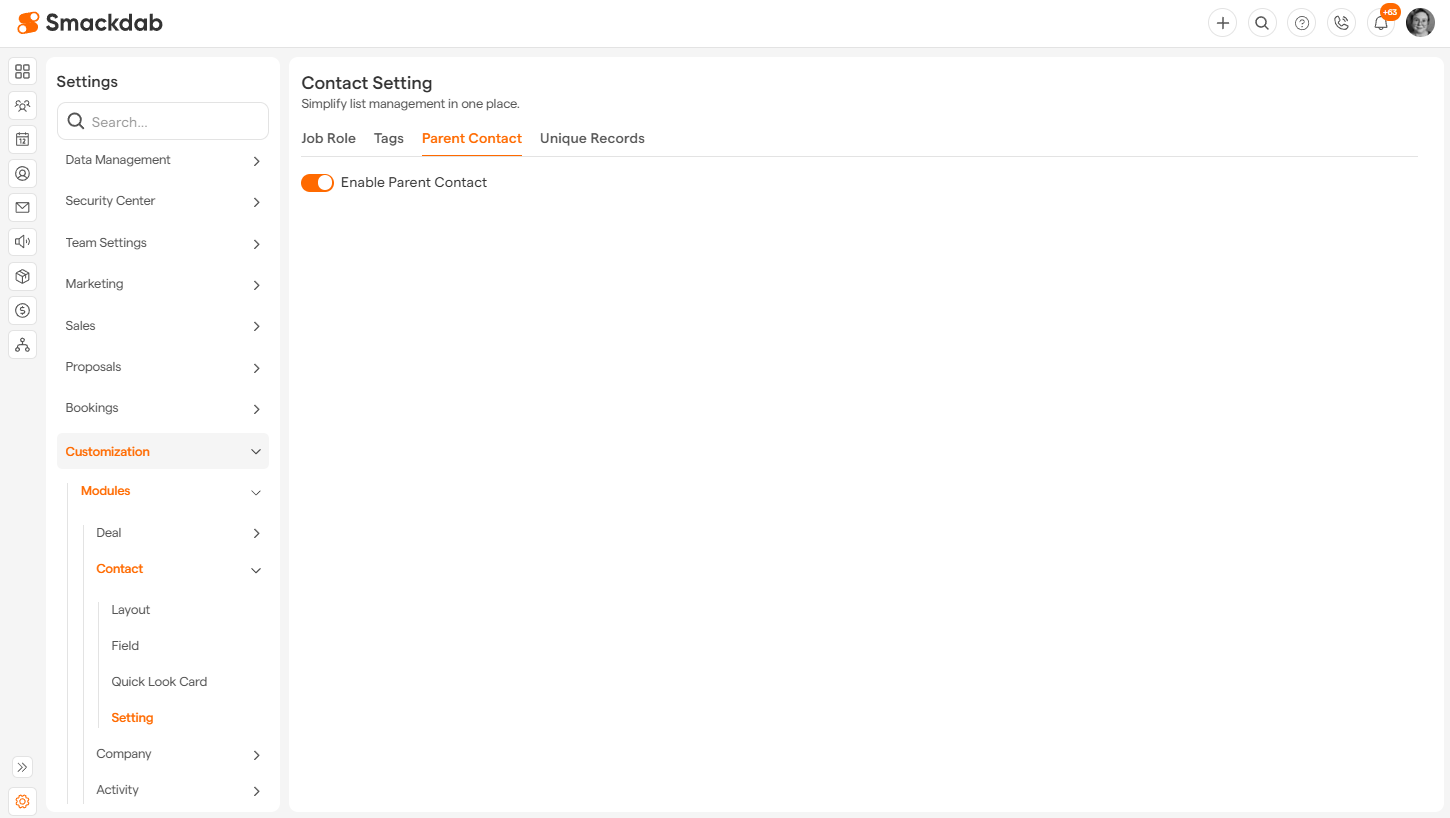
You'll enable the same setting under Settings>Customization>Modules>Company>Setting, under the Parent Company tab.
CRM data that syncs between both iPoint and Smackdab:
Name
First Name
Last Name
Job position
Tags
Birthday
Main Email
CC Email
Main Phone
Mobile Phone
Alt Phone
Company ( Added as related Company )
Account Number
Partner First Name
Bill to Address
Notes
Parent Contact/Company
CRM data that only syncs from iPoint to Smackdab:
Relationships
Activities
Sales Orders (must be done manually)
Data that currently DOES NOT sync to iPoint, and is unique to Smackdab:
Deals
Invoices
Quotes
Custom modules or fields
Documents or Images
Please note: When syncing customer records, if your record in iPoint is listed as a Person, it will be imported into the Contacts module.
If it is listed in iPoint as a Company, it will be imported into the Companies module.
If you feel as though your Contacts module is missing entries, please check your Company module.
How to sync Proposals or Sales Orders from iPoint to Smackdab?
From within iPoint, you have the option to sync all Sales Orders/Proposals, or single Sales Orders/Proposals to Smackdab.
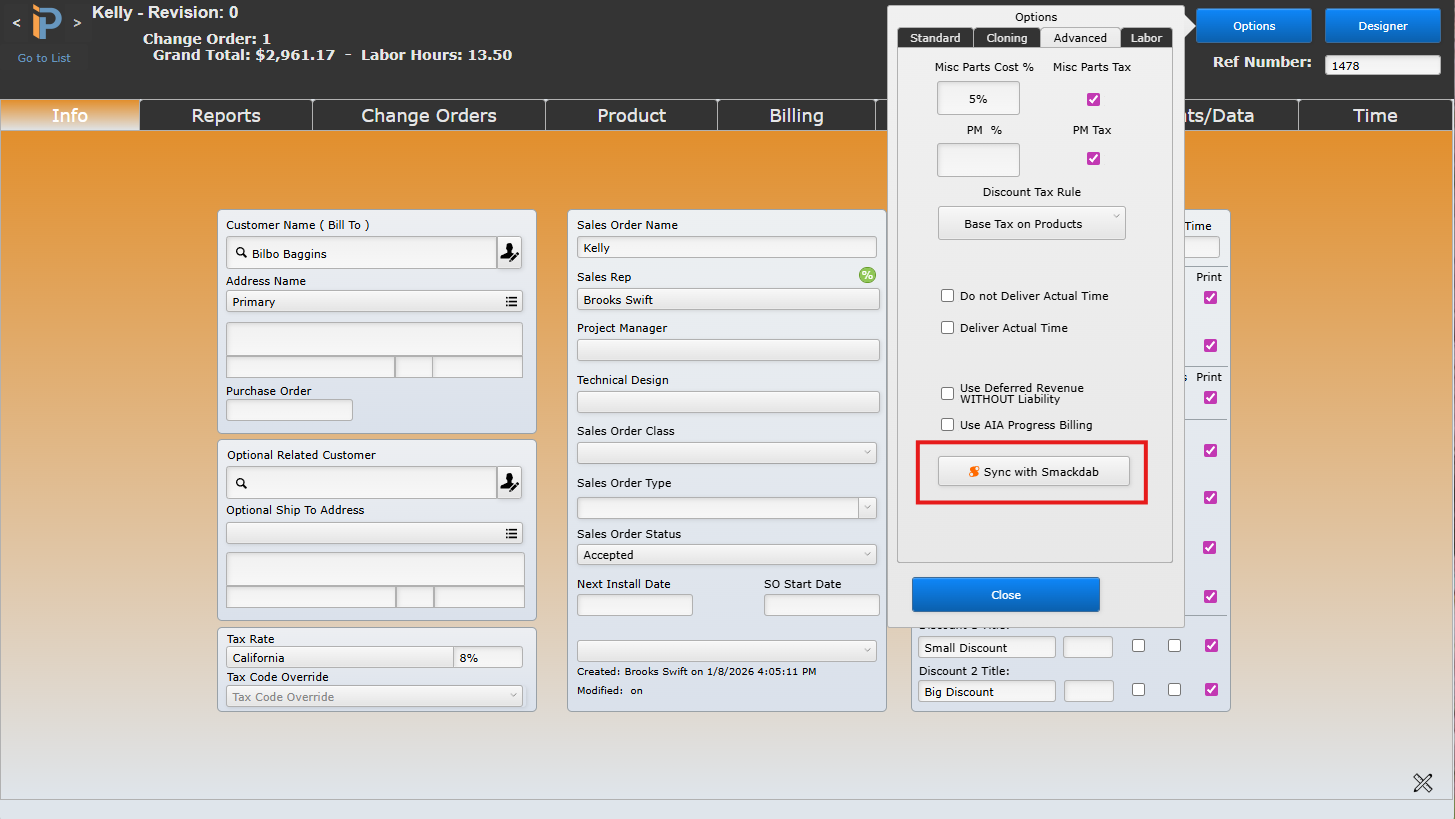
To sync all, go into iPoint and into your Sales Order or Porposal module. Click on the Options button, then on the Advanced tab, and click on the "Sync to Smackdab" button.
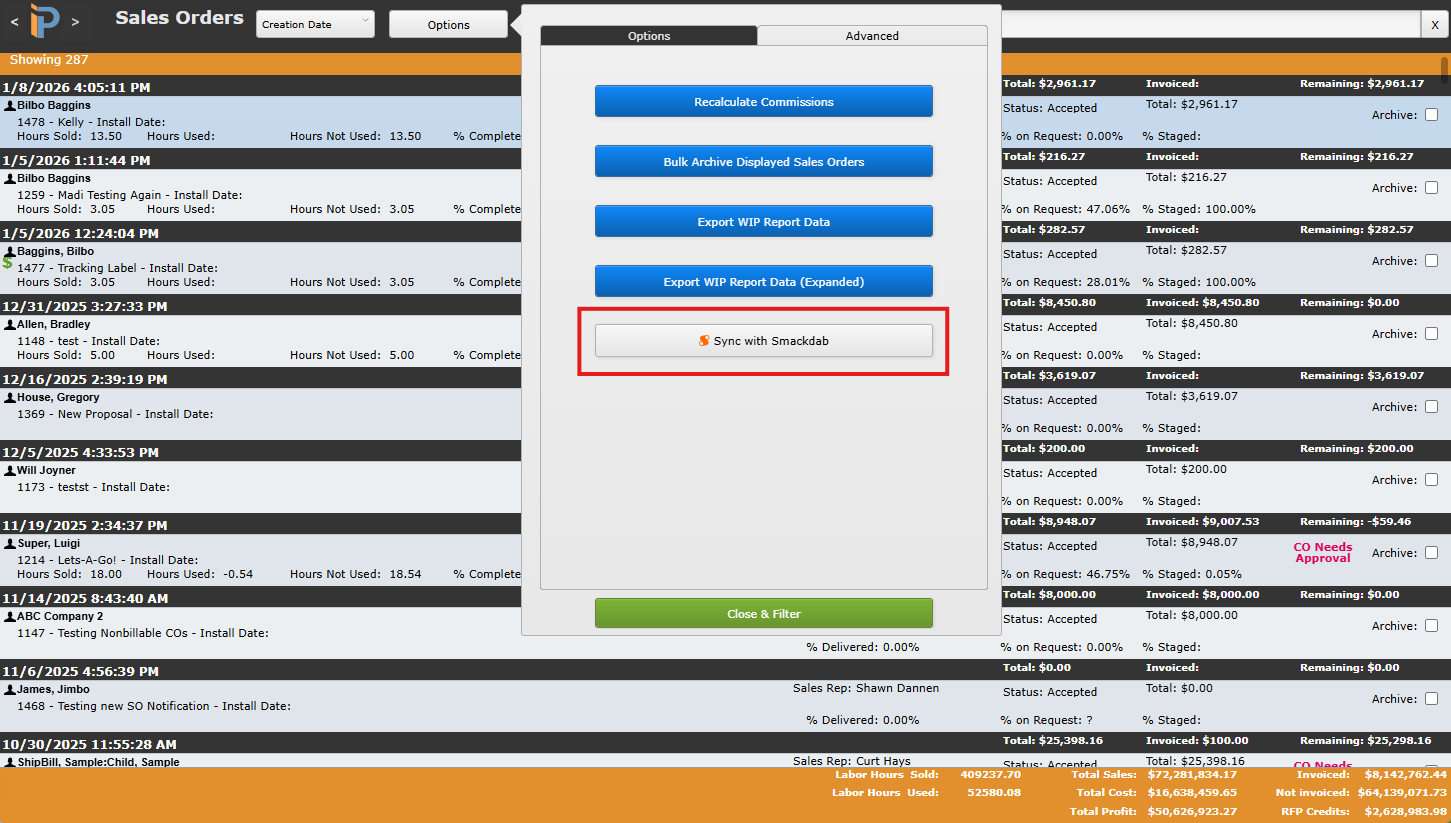
To sync a single record, go into iPoint and into your Sales Order or Proposal module. Click into the record you want to sync to Smackdab. Click on the Options button, and then the Advanced tab, and click on the "Sync to Smackdab" button.
Once the Sales Order or Proposal is synced to Smackdab, it will be added to the default "Residential Pipeline". A Proposal will go into a stage called "Proposal Creation". A Sales Order will be added to a stage called "Sales Order."
From there, you can go into the record in Smackdab, under the Deals module, to adjust the pipeline and stage and make it your own. The title of the Sales Order or Proposal in iPoint will be the "name" of the record in Smackdab, and it will have the same contact record already connected to it.
How to Manually Sync CRM Records from iPoint Online:
If you have Smackdab set up to only bring in data from iPoint manually, you can push that data using iPoint Online.
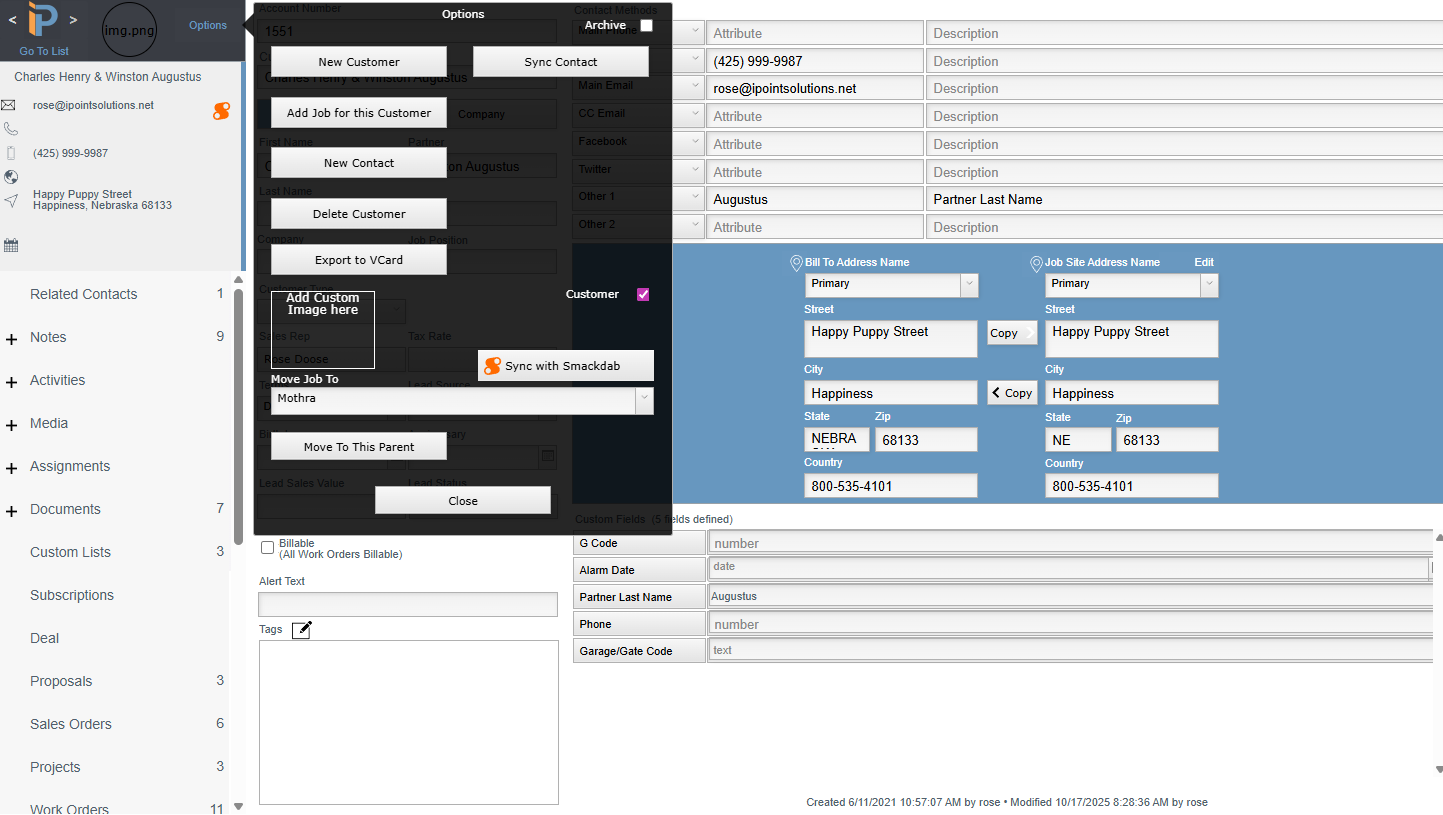
Go into the CRM, to the record you want to send to Smackdab. Then click on the Options button. From here, you'll see the button that says "Sync with Smackdab" - click it to send this record to Smackdab.
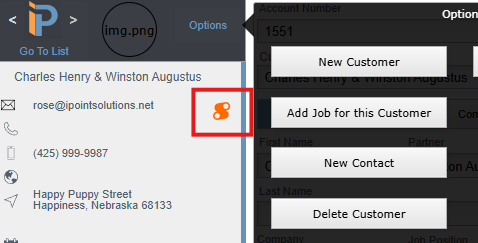
You'll also see that any record that is currently synced with Smackdab will have the Smackdab logo next to the email address/phone number in iPoint Online, in the contact details area.
Future updates planned for iPoint/Smackdab syncing:
Syncing Documents (both to/from iPoint and Smackdab)