
The Automations module in Smackdab is like having an incredibly efficient assistant that takes care of repetitive tasks for you! By setting up simple rule-based workflows, you can automatically trigger actions like sending emails, updating information, or creating tasks based on specific conditions or events. This means less manual work for your sales, marketing, and support teams, freeing them up to focus on what they do best. With automations, you'll save time, boost consistency, and ensure everyone gets timely follow-ups throughout their entire customer journey.
Discover What Automations Can Do For You:
Route Leads Instantly (Lead Assignment): Automatically send new leads to the perfect sales representative based on factors like their location, how they found you, or their product interest.
Never Miss a Follow-Up (Follow-Up Reminders): Set up automatic tasks or reminders so your sales team always knows the right time to connect with leads or customers.
Make a Great First Impression (Welcome Emails): Automatically send a warm welcome email to new leads or contacts as soon as they're added to Smackdab.
Keep Deals Moving (Pipeline Progression): Smoothly advance deals to the next stage in your sales pipeline or update their status automatically when certain conditions are met.
Capture Every To-Do (Task Creation): Automatically generate tasks when important actions happen, like when a form is submitted or a call is missed, ensuring nothing falls through the cracks.
Seamlessly Welcome New Clients (Customer Onboarding): Kick off your onboarding process automatically when a deal is marked as "won" or a new client signs up, providing a great experience from day one.
Proactively Care for Customers (Churn Prevention): Get timely alerts or send automated emails if customer activity drops or other warning signs appear, helping you step in before it's too late.
Stay Informed (Notification Alerts): Send automatic internal notifications to your team members when high-priority actions need their attention, keeping everyone in the loop.
Create a New Automation
Let's get a jump on setting up your first Automation by navigating to Automation>Automation, and clicking on the "+ Create Workflow" button in the top right corner of the screen.
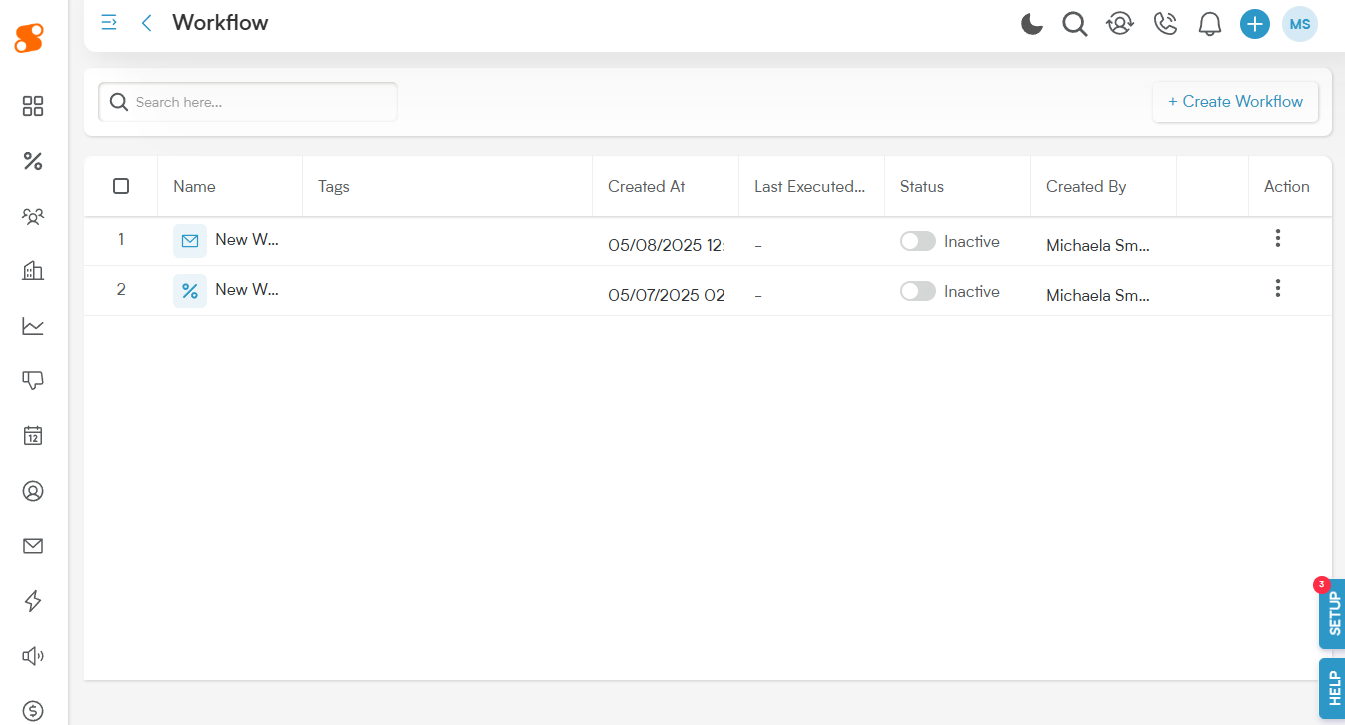
You'll be brought to the Workflow page, which will show your Triggers and Actions in Blocks, similar to Sequences or Hierarchies.
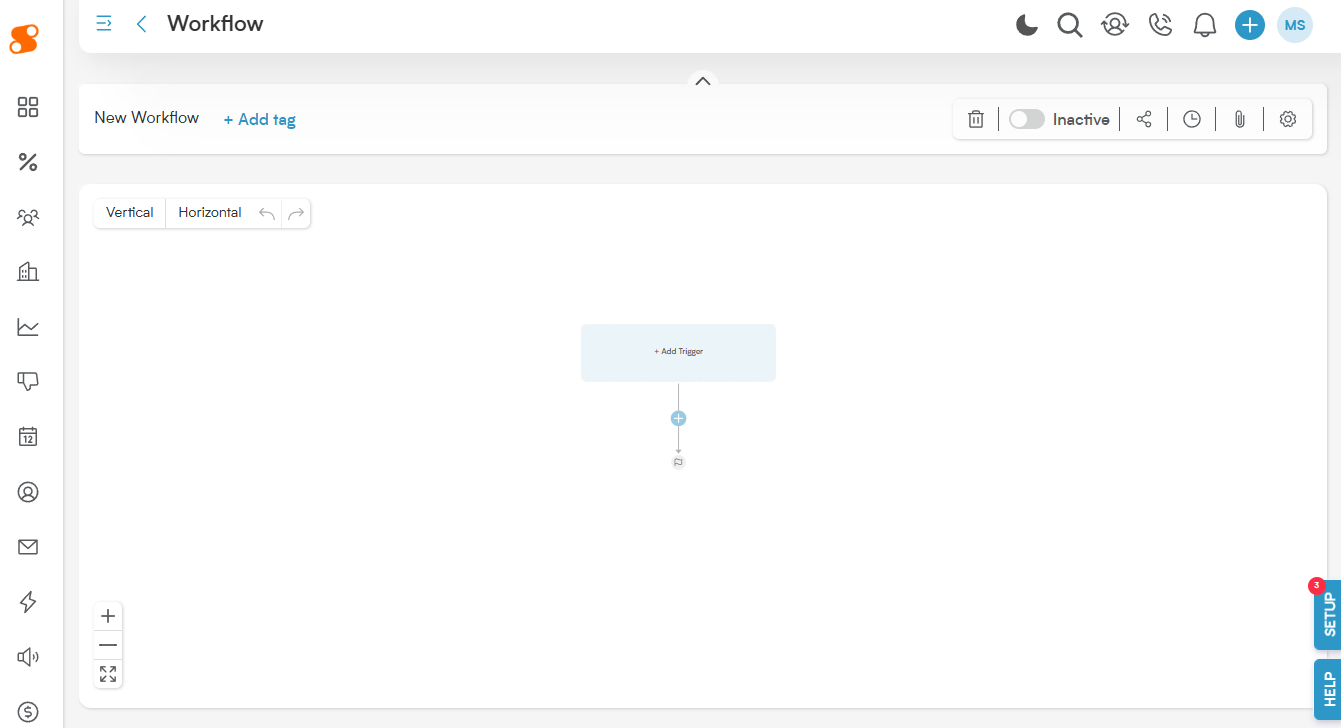
On this screen, you can "grab" the workflow with your mouse cursor and drag the workflow around, use the scroll wheel + CTRL button to zoom in or out, or use the buttons on the lower left hand corner of the screen to zoom in, zoom out, or fit the screen to the page. On the upper left hand corner, you have the option of clicking the "Vertical" or "Horizontal" buttons, which will rotate the direction of the workflow. This area also has Undo (arrow pointing to the left) and Redo (arrow pointing to the right) buttons.
At the top right of the screen are several buttons that will help you once your workflow is complete:
Garbage Can: This allows you to delete the workflow.
Inactive/Active Toggle: Marks the workflow as active or inactive by clicking the toggle, turning the Automation on/off.
Share: Share a link to the workflow.
Clock: Shows you the execution history of the Automation (showing the actions it's done, when they were done, etc.).
Paperclip: This is the revision logs, showing the changes that have been made to the workflow, when the changes were made, and who made the changes.
Gear: Clicking this gives you access to the workflow settings, allowing you to set dates you want the actions to be paused, setting who should be notified when the workflow triggers, allows you to set a stop condition (so if a specific action happens, it will stop the workflow), and set a limit on how often the workflow should be able to run.
By clicking on the title "New Workflow" in the top left, you can change the name of the workflow/automation that you have open. You can also add tags to help you track this workflow later on, by clicking the "+ Add Tag" button.
Now that you are familiar with the window, we can get started on learning how to create a new Automation.
First step is to click the "+ Add Trigger" button in the center of the first block.
A Trigger is what will make the Automation begin moving through the steps of the workflow. Let's go through the options available for the Triggers:
Custom Event: This can be a trigger based on any module that you have set up in Smackdab. Some possibilities are when a company is created, when a deal is updated, or when an email is received.
Schedule: This will trigger the Automation to run based on a time frame - for example, if you want a reminder to be sent out to the Sales team every day at 1PM, you can start with this trigger.
Marketing: This triggers based on when a List or Form is updated.
Appointment Booked: When someone schedules an appointment through a Booking Type form, this will trigger based on the settings you've chosen.
-
Manual: Setting the trigger to Manual means that this automation will only run when you run the automation workflow yourself.
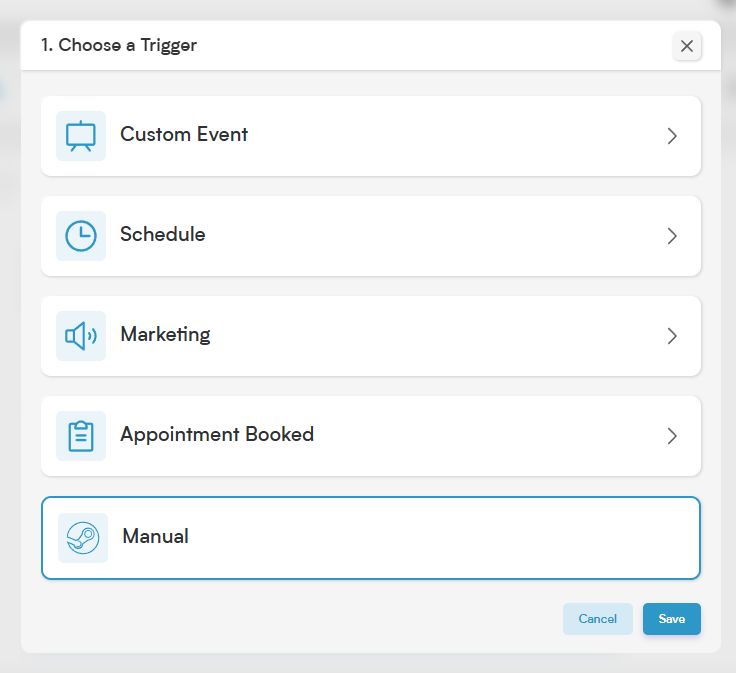
Choose a Trigger
Next, you'll have to choose when you want your following action to occur. The options on your Next Step window are:
Instant Condition: Use this to evaluate the data received in the trigger - in the case of an Appointment Booked trigger, this means it will be based on the customer's information from the booking form. You can create And/Or conditions, run workflow based solely on the data received or not received (such as if they submitted the form with blank data, or if it's from a specific customer), and even run based on if the conditions were met or not met.
Wait For Condition: This option will only be available to use if the Next Step is after an Action - this will allow you to hold the workflow's process until a condition has been met.
Loop: Run actions repeatedly for each item in a multi-value field.
Sequence: This will run based on a Sequence that you have created (or you can click this to create a New Sequence) in Automations>Sequence.
-
Action: This begins an Action immediately in one of your modules in Smackdab, such as creating a new contact, creating a new activity, or sending an email. There are a lot of options by default, so let's go through them real quick:
Module-based Action: Company, Contact, Deal, Activity, etc. - you can create a new entry automatically in one of your modules.
Email: Send an email out after the trigger has happened.
Celebration: This will make fun things show up in Smackdab when the trigger occurs - such as confetti flying around on the screen.
Broadcast: Allows you to broadcast a message to all of your users who are actively in Smackdab.
HTTP Request: If you're web-savvy, you can use this to set up a HTTP request (GET, POST, PUT, PATCH, DELETE, HEAD) with headers and a custom URL.
Marketing List: Create a new list or update an existing one.
-
Delay: This will delay the following action by the amount of time that you've specified.
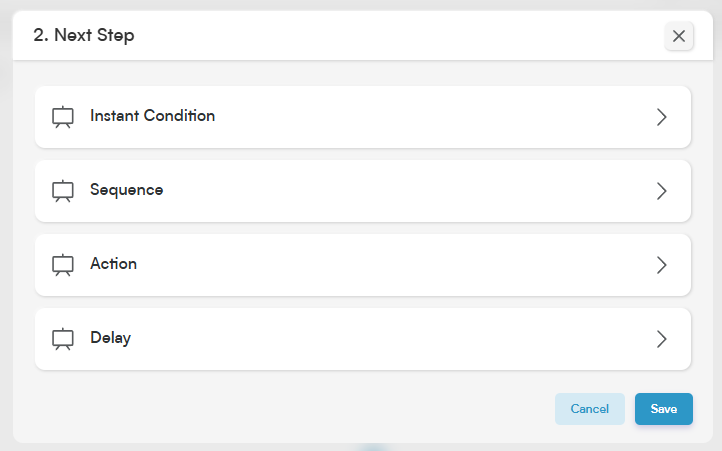
Next Step
From there, you can continue building your automation until it reaches the goal you've set for your company's needs.